Primeiro podemos olhar para a aparência da câmera. Normalmente, a dimensão da câmera com lente fixa é menor do que a câmera com lente vari-focal. Enquanto isso, a câmera vari-focal tem componentes auxiliares, como controle de íris, motor, engrenagem. Em segundo lugar, podemos nos referir à especificação da lente. Geralmente a distância focal da câmera fixa é um valor fixo, mostrado na imagem abaixo:
| Rubricas | Descrição | Tolerâncias |
| Distância Focal | 3.6mm | ±5% |
| Abertura (D/f) | F2.0 | ±5% |
| Círculo de imagem | 1/2.7" | >6.9mm |
| Faixa de foco | 0.3m~INF |
Enquanto a distância focal da câmera vari-focal é uma faixa de valor, mostrado na imagem abaixo:
| Rubricas | Descrição | Tolerâncias |
| F No. | 1.5 | ±5% |
| Distância Focal | 3.6-11mm | ±5% |
| Distância Focal Traseira Ótica | 6.24mm (In Air) | ±0.1 |
| Distância Focal Traseira Mecânica | 13.20mm (In Air) | ±0.1 |
| Círculo de imagem | 9 |
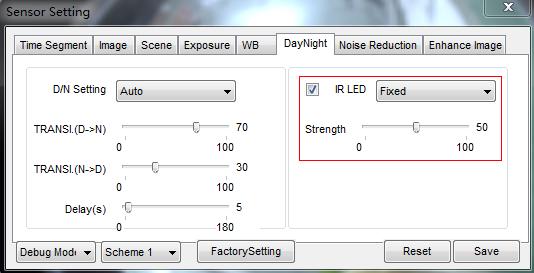
Invoque as configurações do sensor clicando com o botão direito do mouse em vídeo ao vivo, mude para o modo fixo e, em seguida, ajuste o valor em Configurações de dia e noite.
Isso pode ser causado por conflito de IP, altere o endereço IP de um dispositivo.
Como o DHCP é aberto por padrão, se a câmera não estiver alocada com IP pelo serviço DHCP, seu IP padrão é 192.168.0.120 e conta de login/senha: admin/admin
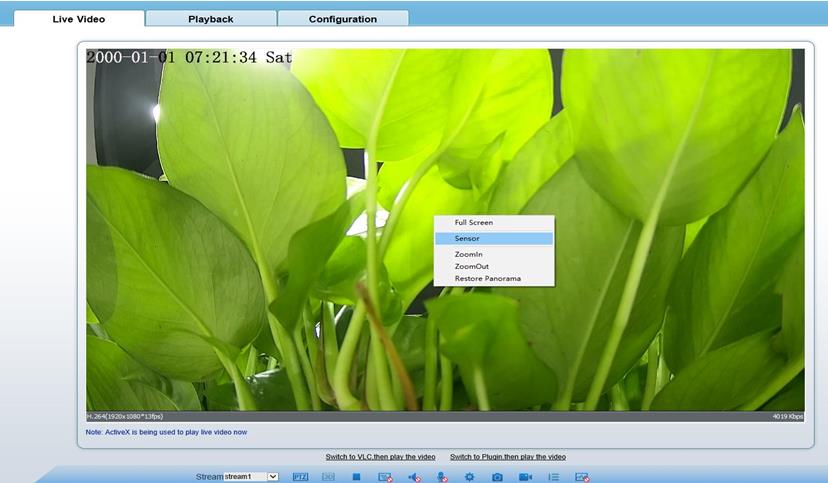
Clique com o botão direito do mouse no vídeo ao vivo, selecione o sensor, mude para o modo de depuração e defina-o no menu de imagem:
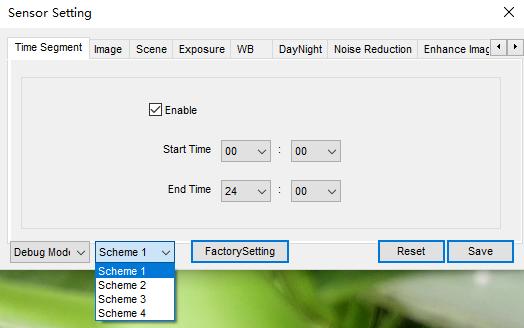
No menu de configuração do sensor, você pode definir no máximo 4 esquema para a configuração de imagem e período, Depois que a configuração for concluída, alternar o modo de volta para o modo padrão, em seguida, a câmera aplicará o parâmetro de imagem de acordo com o segmento de tempo em que estava, se o tempo não estiver nesses 4 esquema, ele aplicará a configuração padrão, Se o tempo cruzar dois esquemas diferentes, o esquema anterior funcionará.
consulte a tabela abaixo
Distância focal | Campo de visão (por exemplo) | Recomende a distância do monitor |
2.8mm | 98.5° | Cerca de 3 metros |
4mm | 79° | Cerca de 6 metros |
6mm | 49° | Cerca de 10 metros |
8mm | 40° | Cerca de 20 metros |
12mm | 23° | Cerca de 30 metros |
16mm 19.2 | ° | Cerca de 50 metros |
25mm | 12.4 | °Cerca de 80 metros |
※Campo de visão ângulo varia de modelo diferente, consulte o site oficial para parâmetro preciso | ||
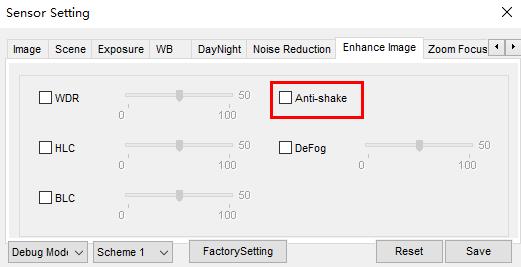
Quando a câmera é instalada em condições instáveis (como no veículo ou árvore, a função anti-vibração aumentará a estabilidade da imagem
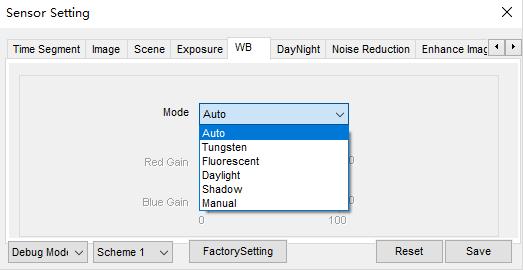
Entre na interface de configuração do sensor, ajuste o modo de balanço de branco no menu WB
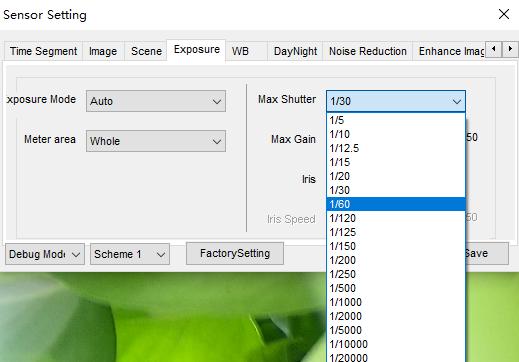
Chame a interface de configuração do sensor, ajuste o obturador no menu de exposição
1. Certifique-se de que o disco rígido está bem (verifique substituindo por outro novo)
2. Ao pendurar com vários discos rígidos, note que a fonte de alimentação pode atender ao requisito, o monitoramento do disco rígido especializado é mais estável com menor corrente de partida, menor velocidade de trabalho e consome menos energia do que o disco rígido do consumidor, se a fonte de alimentação não for suficiente, o disco rígido não será capaz de funcionar, o que resulta em disco não reconhecido e falha de gravação.
3. Se o NVR pode ler o disco, por favor, formate o disco primeiro, como na maioria dos casos, repetir a leitura e gravação irá gerar fragmentação do disco ou setores defeituosos, um processo de formatação irá ignorar ou reparar o setor defeituoso.
Sim, é acessível para os dispositivos de terceiros que suportam o protocolo ONVIF.
Por favor, conecte o NVR ao roteador, e certifique-se de que a função DHCP do roteador está habilitada, e abra a função de obter automaticamente IP no menu de configuração de rede NVR
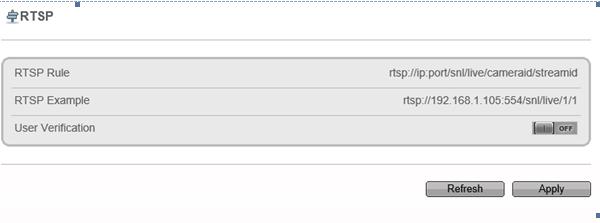
Formato RTSP: rtsp://ip:port/snl/live/cameraid/streamid
Exemplo: rtsp://192.168.1.19:554/snl/live/1/1
1. Por favor, verifique se o nome de usuário e senha está correto ao adicionar a câmera
2. problema do cabo de rede, use o cabo CAT5e ou CAT6e, Recomenda-se usar 8 núcleos para o fio, a sequência do cabo POE para transmissão de dados é 1/2/3/6, para potência positiva é 4/5, para potência negativa é 7/8, a distância do cabo deve ser controlada em torno de 70 metros
3. câmera não está ligada, por favor, verifique se a câmera suporta POE
Se a câmera é câmera sunell, e você não sabe o ip, por favor, conecte a câmera e o PC na mesma rede local (ou conecte diretamente a câmera ao PC), usando a ferramenta IPsearch para encontrar o IP correto, em seguida, adicioná-lo ao NVR; Se a câmera é de terceiros, verifique se eles fornecem ferramenta para pesquisar o IP da câmera, em seguida, adicioná-lo ao NVR por entrada do IP, nome de usuário e senha da câmera
1. A fonte de alimentação do IPC não é estável, por exemplo, o IPC consumirá mais energia à noite com o IR Led ativado, o que pode causar eletricidade insuficiente.
2. Problema de largura de banda de rede, o desempenho do switcher é insuficiente
3. Problema da câmera:
Se apenas a câmera ou canal especificado tiver esse problema, recomendamos que você substitua por uma câmera normal para verificar
Se o problema offline acontecer aleatoriamente com todos os canais, sugerimos verificar os motivos 1 e 2
Se offline acontece com todos os canais ao mesmo tempo, verifique se a câmera é alimentada por fonte centralizada, Por favor, verifique o status de energia
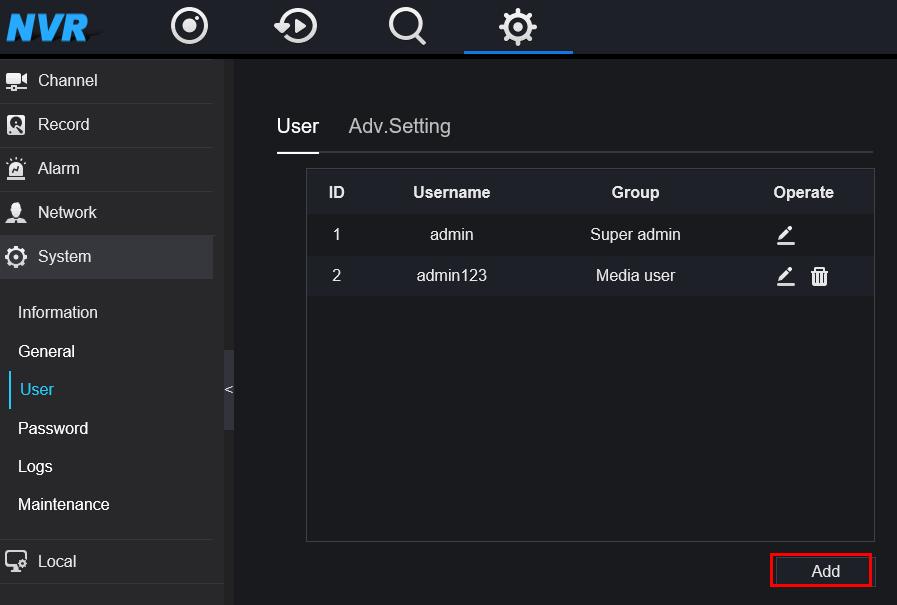
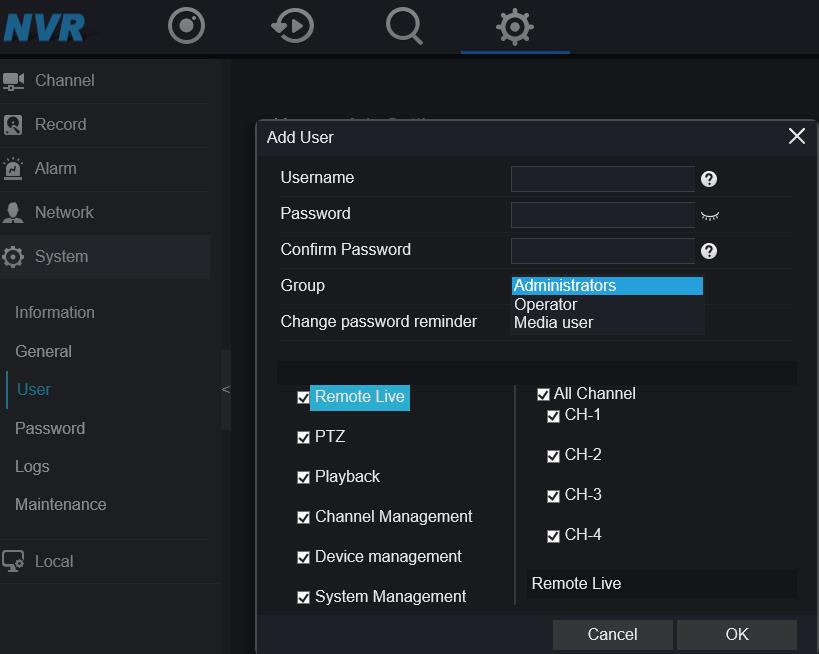
Em System-User-Add:
3 grupo diferente de usuário pode ser criado:
Administrador/Operador/Usuário de mídia,
Administradores: Remote Live, PTZ, Reprodução, Gerenciamento de Canais, Gerenciamento de Dispositivos, Gerenciamento de Sistema;
Operador: Remote Live, PTZ, Reprodução, Gestão de Sistemas;
Usuário de mídia: Remote Live, Reprodução; (lembre-se que a conta de administrador é o superusuário, ela não pode ser excluída);
Channel selection:
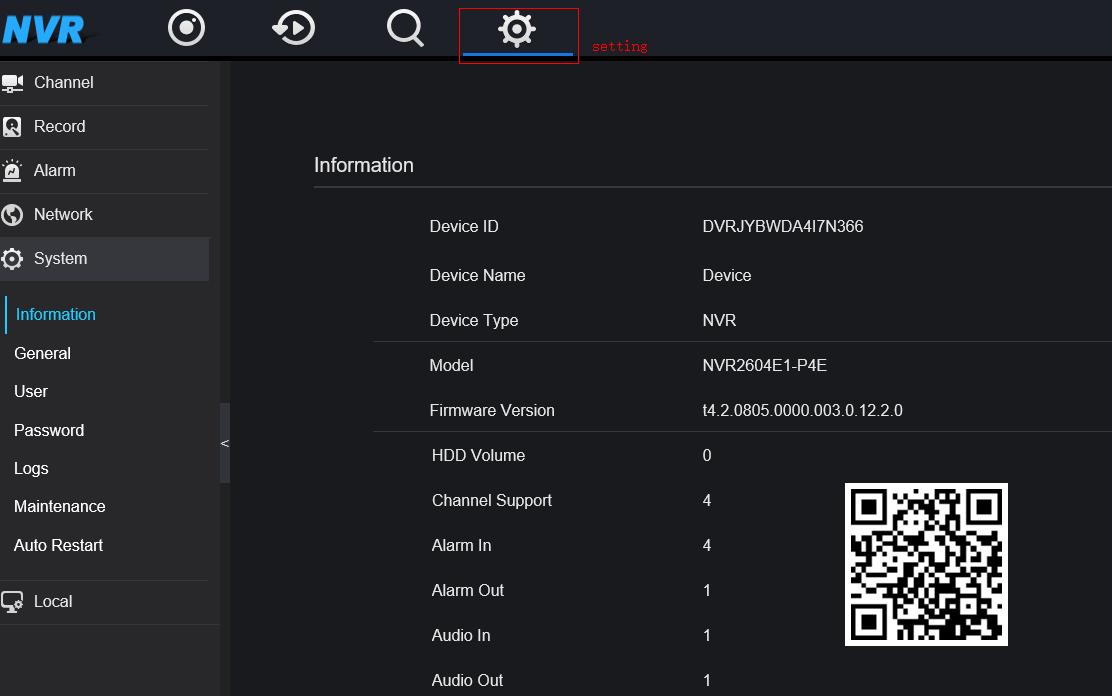
Para interface antiga: vá para "Setup"->"Device Information"

Para nova interface: vá para "configuração", então você pode obter informações
Execute o software Sunview
1. abra o módulo "Dispositivos"
2. clique em "Auto Search" para encontrar as câmeras IP
3. selecione-o
4. clique em "Adicionar" para adicioná-lo à lista
de dispositivos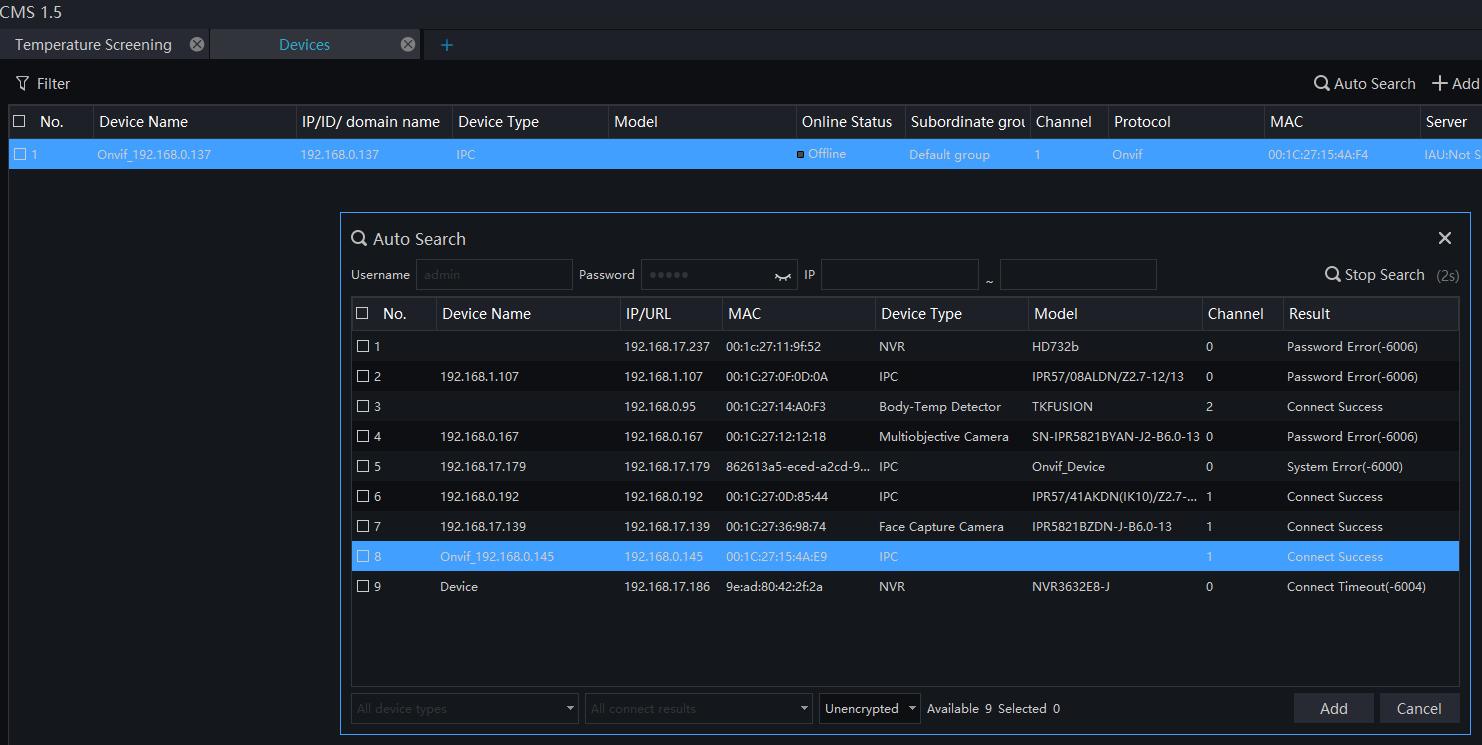
Deteção de rosto: Em
Coeficiente de Confiança: Mid
Smallest Pixcel: 80
Qualidade de Mate de Imagem: Mid
Snapshot Modo: Timing
Upload Intervalo de imagem: 5s
Yaw Degree: 60
Titt Degree: 60
definindo área
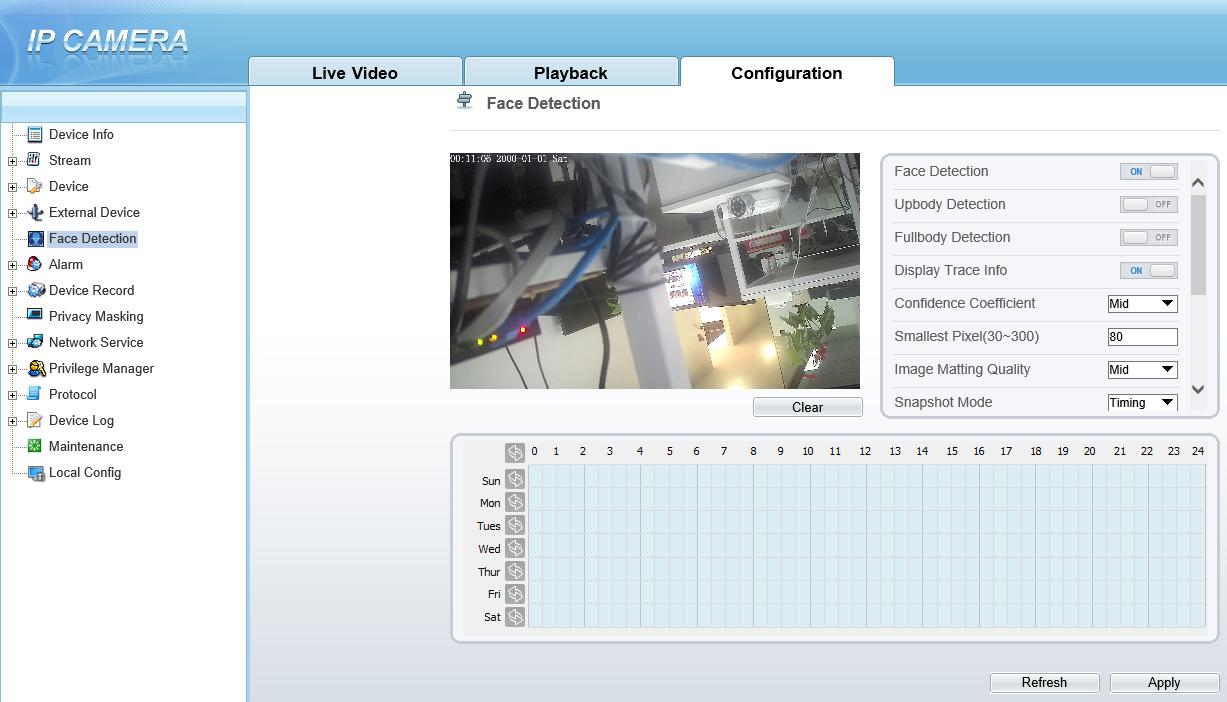
1. Deteção de rosto: Detetar o rosto do ser humano
2. Up body detection: Detetar a parte do rosto e ombro do ser humano
3. Deteção de corpo inteiro: Detetar a forma humana
4. Display trace: Exibe as informações do rastreamento
5. Coeficiente de confiança: Sensibilidade de deteção de face, o intervalo de valores é alto, médio ou baixo, quanto maior o valor, maior a sensibilidade. Quanto maior for o valor de sensibilidade, maior será a taxa de deteção, mas mais falsas deteções podem ocorrer, como a falsa deteção dos padrões em roupas de pedestres para rostos adultos.
6. Menor pixel: Quando o pixel do rosto na imagem é menor do que o valor definido (o pixel mínimo para reconhecimento facial), ele não é capturado.
7. Modo instantâneo: Existem dois tipos de temporização e ideal.
8. Intervalo de upload da imagem: 1~10 seg.
9. Grau de guinada: Defina o ângulo da face para filtrar
10. FTP upload image matting: Ativar ou desativar
11. FTP carregar imagem inteira: Ativar ou desativar
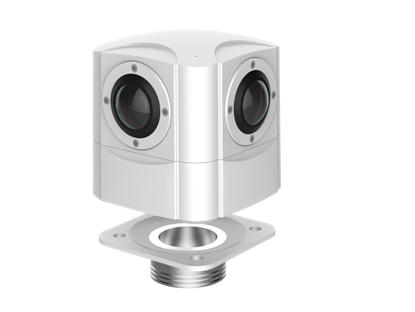
1. lResolução 8K@30fps
2. lH.265 Codificação inteligente
3. lCampo de visão horizontal 360° + vertical 360°
4. Saída de imagem de emenda panorâmica de borda
5. Comprimento mínimo de foco do objeto 1m
6. Modo de visualização de suporte 180°, 360°, olho de peixe, planeta, auto tour
7. Fonte de alimentação POE
8. IP66, -40℃~60℃
1. A matrícula deve ser legível e bem iluminada
2. As dimensões das placas devem ser pelo menos :
* 150 pix para placas retangulares e 100 pix para placas de duas fileiras (para Rússia, Cazaquistão, Armênia, Uzbequistão, Sérvia).
* 130 px para placas retangulares e 70 pix para placas de duas fileiras (para todos os outros países suportados).
3. Inclinação permitida 5 graus (relógio e anti-horário).

4. Ângulo vertical e ângulo horizontal: não deve exceder 30 graus:

5. Exemplo de boa placa de carro de dia e noite


1. Pode ser o DVR reconhece a fonte de sinal de entrada incorretamente e precisa conectar e desconectar o cabo BNC novamente.
2. Pode ser o problema da linha coaxial, de modo que a linha coaxial precisa ser substituída
3. O DVR pode não suportar a fonte de entrada da câmara HD coaxial (incluindo o modo de sinal, resolução, taxa de quadros). É necessário mudar o modo de sinal para CVBS através do interruptor de cinco vias da câmara e, em seguida, mudar para a fonte de entrada correta através do menu OSD da câmara.
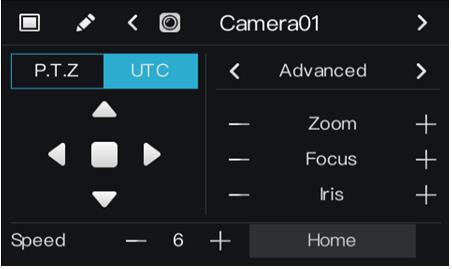
1. Chamada através da função UTC do DVR
2. Ligue através do interruptor de cinco vias da câmera

A câmara de apoio coaxial sinal de comutação para o sinal analógico terá um interruptor de cinco vias, como mostrado na figura. Se a saída analógica for necessária, pressione a tecla set por 5 segundos para alternar a fonte para CVBS. Se não houver interruptor de cinco vias, a câmara só suporta saída de sinal coaxial.

O par trançado é usado para tranmit sinal HD, ea imagem é fácil de ser perturbado, não é recomendado usar par trançado para transmitir sinal HD.
O sinal HD pertence ao sinal de alta definição, que é mais suscetível a interferências do que o sinal CUBS comum
1. Confirme se a linha elétrica e a linha BNC estão em paralelo, de modo que o CA (220V e superior) afetará o sinal HD e separe o tubo
2. Ignorar a fonte de interferência;
3. Adicione jammer, reduza a interferência
4. Recomenda-se transmitir o sinal através de fibra ótica